 Komawari
Guide
From an empty folder to the PDF for the printer. If you have laid out a chapter before, skip straight to the shortcuts.
Where to begin
There are two ways to run Komawari, and they do the same things. All that changes is where the work ends up.
In the browser you install nothing. On Chrome and Edge you can pick a real folder on your disk and the project lives there. On Firefox and Safari the folder cannot be opened, so the project stays in the browser's own storage and you carry it away with Save .zip: it is a complete project, and it reopens anywhere else with Import a .zip project.
In the desktop application you always work on a folder on the disk, with no permissions to confirm again and no detour through a zip.
Neither way involves a server: the chapter never leaves this computer.
Komawari follows the language your browser asks for. It is in English unless you ask for Italian, and anything else falls back to English. There is no setting to hunt for: you have already told your system which language you read.
Creating a project
Give the chapter a title and choose the format. There are four presets: A5, the Italian bookshop format and the default; B5 JIS, the Japanese magazine size; Tankōbon, pocket-sized; and Custom, with every field free. The measurements of each are further down.
The format is not a cage: you can change it at any time from the inspector. The layout's weights are relative, so panels re-fit themselves and the tilts survive. Artwork you have already placed keeps its scale, though, and is worth re-fitting: when you change format Komawari asks, and can do the whole chapter in one go.
Where the work ends up
A project is a folder. Inside you will find project.json, which is the
document itself, and assets/ with copies of the artwork you imported. The
images are copied there on purpose: move the folder to another disk and the chapter
reopens identical, because every path written in the project is relative.
How the window is laid out
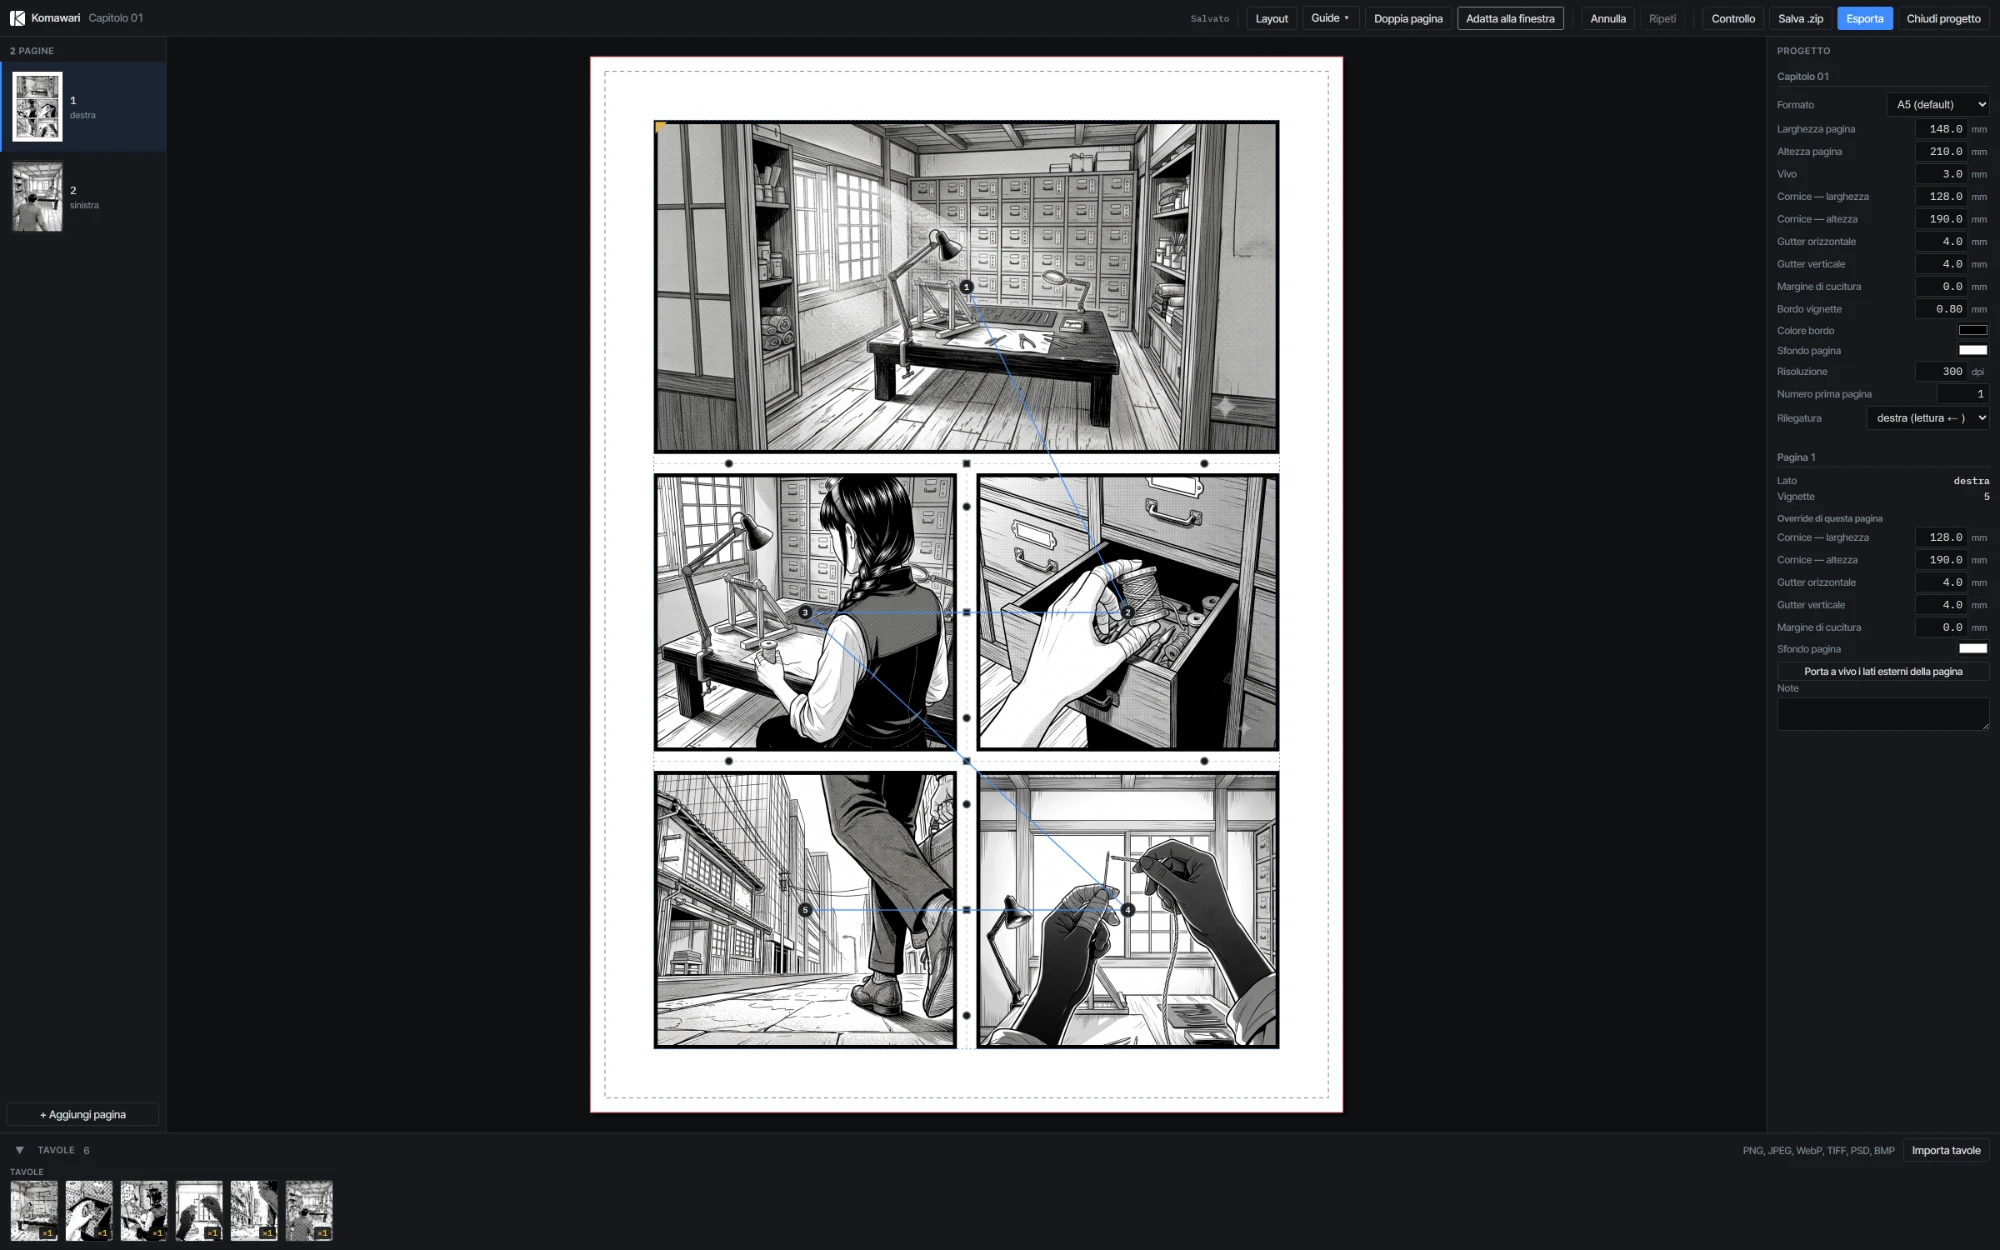
On the left, the page list, with the number and the side each page will fall on once bound. In the centre, the sheet. On the right, the inspector, whose contents change with what you have selected. Along the bottom, the artwork tray, which can be collapsed.
In the top bar, besides the page layouts and the export, you will find the saving status, the guides menu and the switch to the two-page view.
Moving around the sheet
- The wheel zooms in and out, staying anchored to the point under the cursor.
- Drag the sheet with the middle mouse button, or by holding the space bar and dragging with the left one.
- Fit to window puts everything back in place.
Pages
The + Add page button at the foot of the list adds a page after the current one, and Ctrl N does the same. The button stays visible because some browsers keep that combination for themselves.
Every row in the list can be duplicated or deleted, and dragged to reorder. Numbering redoes itself: there is no "page number" field to keep up to date by hand.
Right or left
With right-hand binding, which is what manga use, odd pages fall on the right of the spread and are read first. Under each thumbnail in the list it says which side that page will end up on.
Two pages in the top bar pairs the pages the way the reader will see them. It is worth a look before exporting: that is where you spot the panels crossing the fold and the gaps that do not line up.
If you are going to bind with stitching, the Binding margin field in the inspector narrows the frame on the inner side, the one towards the fold. Komawari works out which side that is, page by page.
Panels
There are three routes to a layout, and they mix freely.
Starting from a template
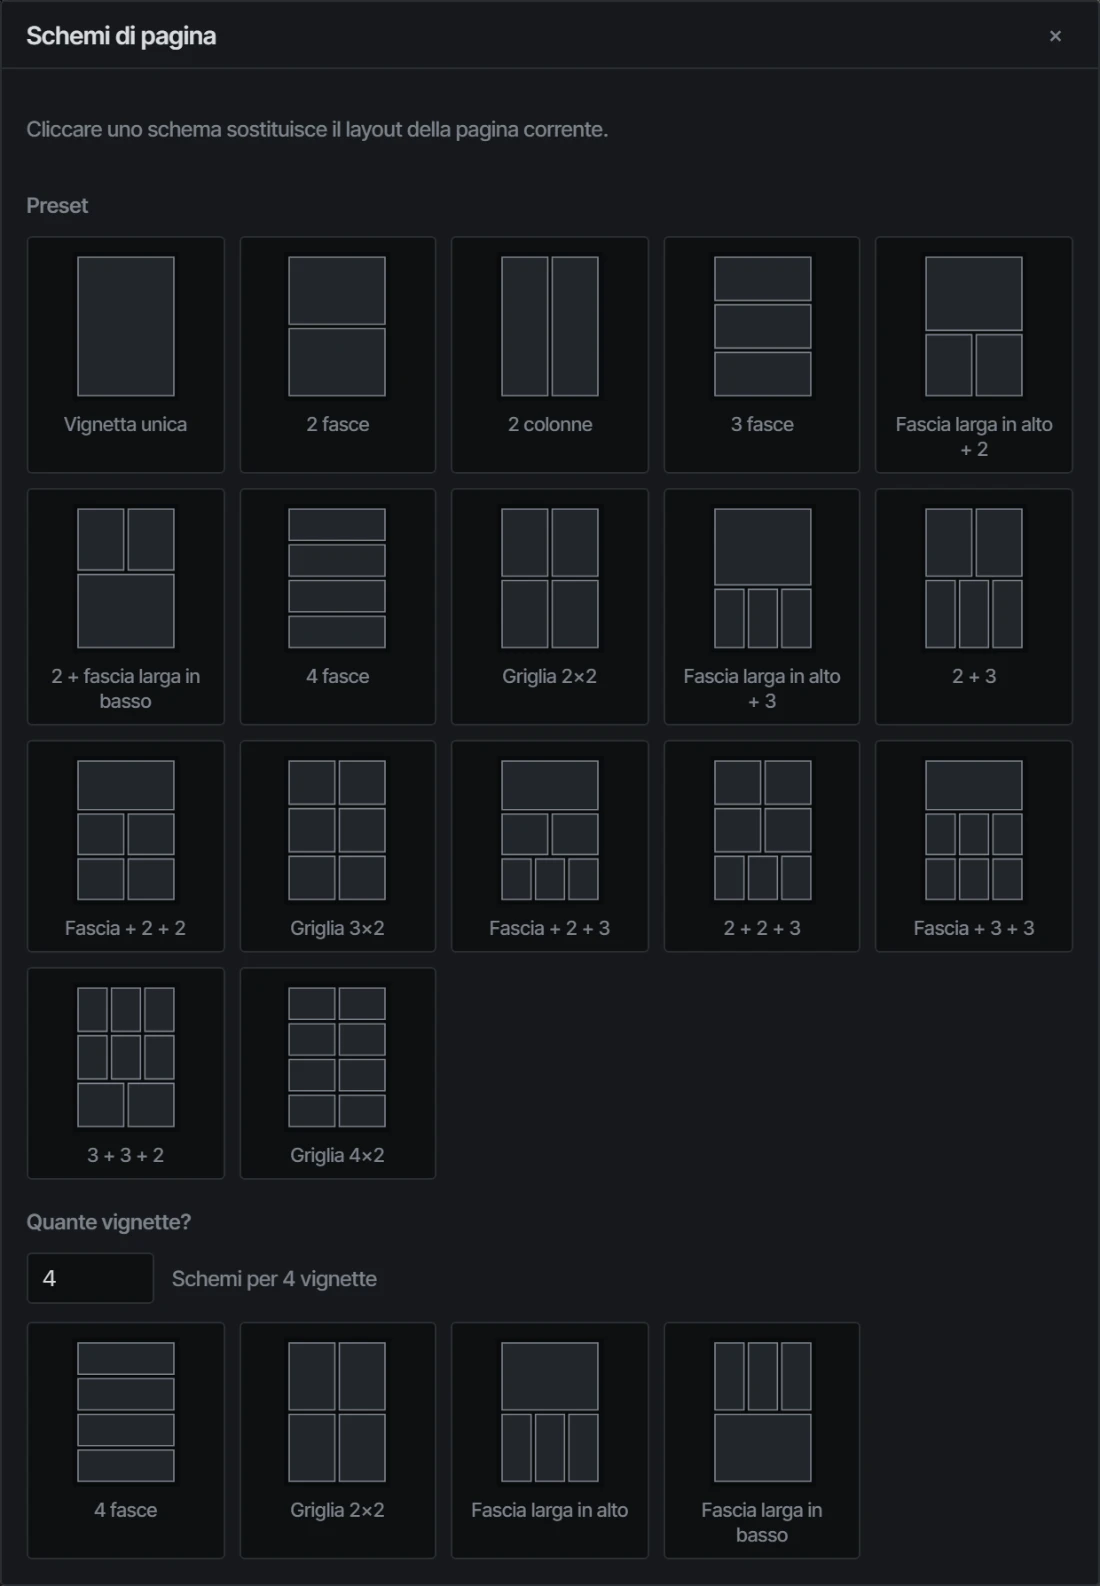
Layout in the top bar opens a library of ready-made templates, from one panel to eight. Below it there is a field where you type how many panels you want, from 1 to 12, and Komawari offers the layouts that work for that number. Clicking one replaces the current page's layout.
Splitting and merging by hand
Select a panel by clicking it, then H splits it into two rows and V into two columns. M merges it with the neighbouring sibling, but only if the two share their whole separator: otherwise the result would no longer be a rectangle, and the command does nothing. Delete removes the panel and its area is absorbed by the sibling.
The same commands sit as buttons in the inspector, if you prefer the mouse.
Changing the proportions
Every separating line has three handles: the square one in the middle moves it, changing the relative weight of the two panels, and the round ones at the ends tilt it.
As you drag the middle handle, the position snaps to the useful fractions: a half, a third, two thirds, a quarter, three quarters, and failing those, to steps of half a millimetre. Alt turns the snapping off and leaves you free.
The gap between panels is called the gutter and comes from the format, but it can be changed for a single node from the inspector: if you want only that row to sit tighter, you do not have to touch anything else.
Tilting a cut
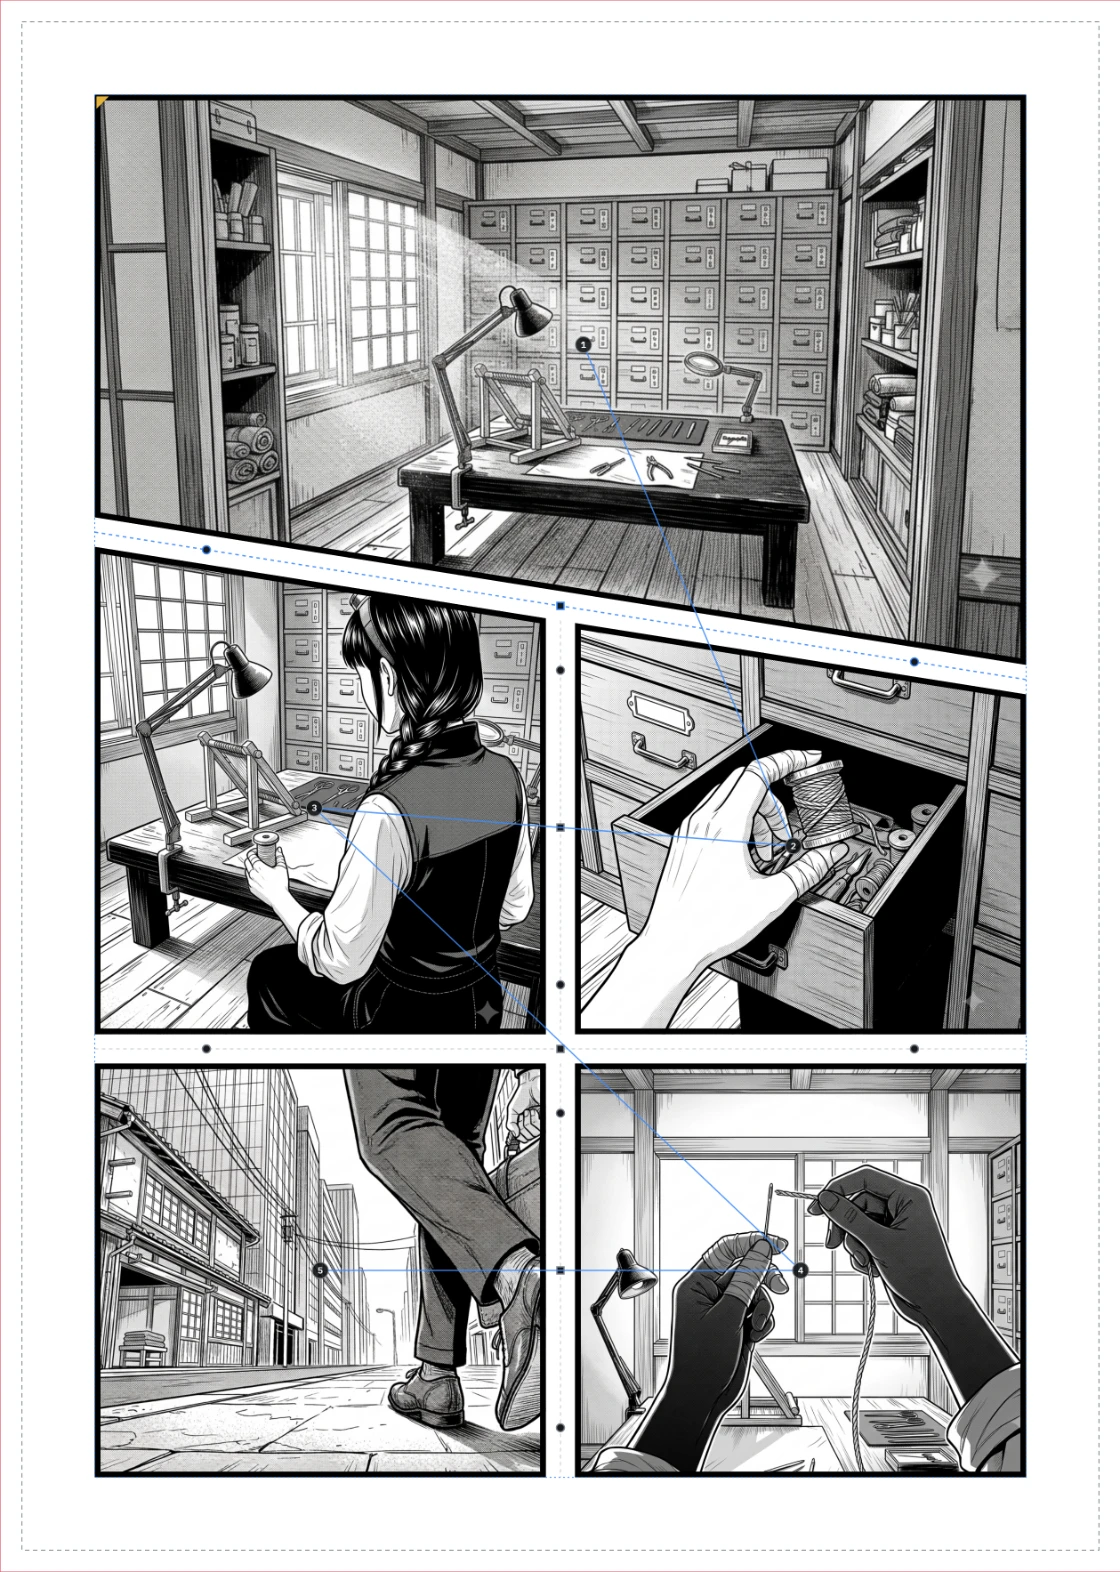
Drag a round handle and the line rotates about its own midpoint. The current angle appears next to the cursor as you drag, and runs from minus sixty to plus sixty degrees.
- Snapping is at 0, 5, 10, 15, 22.5, 30 and 45 degrees, either way. Alt switches it off and frees up tenths of a degree.
- Shift while dragging rotates every separator in that node by the same angle, keeping them parallel.
- 0 with a separator selected puts it back straight. The inspector also has a numeric field, with arrows for one degree at a time, or a tenth while holding Shift.
Two things worth knowing, because they are why tilting does not break the page. First: since the pivot is the midpoint of the cut, the triangle one panel gives up is congruent with the one it gains, so neither of the two gains area at the other's expense. Second: the gutter is measured perpendicular to the line, not horizontally, so 4 mm stays 4 mm even at 30 degrees, which is how the eye sees it and how the printer measures it.
If you push two neighbouring cuts until they cross, the handle turns red and the angle stops before the panel between them disappears. If you get there anyway, by typing the angle in by hand for instance, the preflight check flags it.
Bleed
Bleed is the margin that runs past the trim: it exists so the guillotine does not leave a white line along the edge. In the presets it is 3 mm on every side.
A panel is taken to bleed side by side, from the inspector. The marked side extends to the edge of the bleed, but only if that panel really does touch the edge of the frame: marking an inner side does nothing, and the preflight check says so rather than letting you believe otherwise.
There are two quick commands: one on the selected panel, which takes its outer sides to bleed, and one on the whole page, which does it for every panel along the edge. On a page with a single panel, the second one gives you a full-page plate.
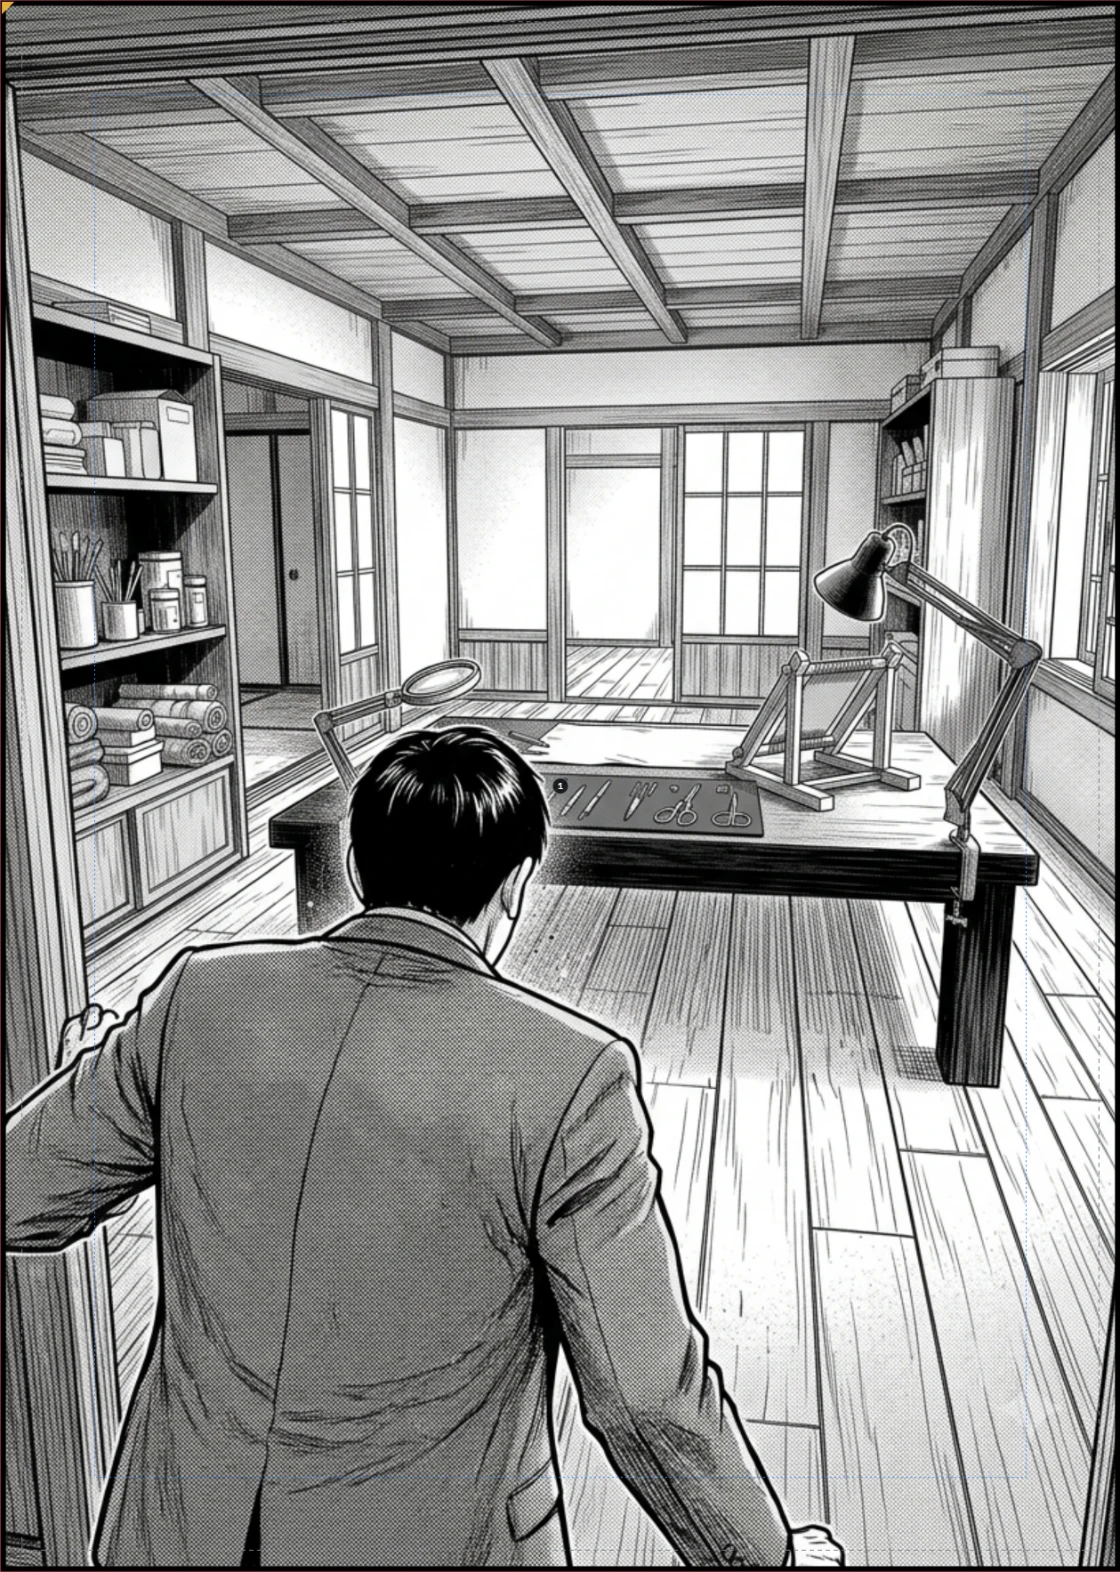
Artwork
A plate is a source image. You import them by dragging them into the window or with the Import artwork button. Komawari reads PNG, JPEG, WebP, TIFF, PSD (the flattened composite) and BMP.
Every imported file is copied into assets/ and recognised by its
contents: if you drag the same image in twice under different names, the project
notices and keeps a single copy.
Putting them into panels
- Drag a file onto a panel and it fills up.
- Drag several files onto a page and they fill the empty panels in reading order, right to left and top to bottom.
- If there is artwork left over because the page is full, Komawari offers to create more pages with the same layout and carry on.
- From the tray along the bottom you drag them into panels one at a time.
Framing
As soon as it is placed, the plate fills the panel without distorting, cropping whatever is left over. From there you adjust it:
- drag inside the panel to move it;
- the wheel makes it larger or smaller, with the panel selected;
- Shift and drag rotates it in steps of fifteen degrees;
- F fits the whole of it inside, even at the cost of leaving space;
- double-click puts scale, offset and rotation back to zero.
Scale, offset and rotation also have their own numeric fields in the inspector, for when you need to be exact.
When the resolution is not enough
At the scale you have put it, a plate can drop below the project's resolution. When that happens a yellow mark appears on the corner of the panel, and the inspector tells you the effective dpi. It does not stop you: you can still print, but you know what you are printing.
Taking one out of the project
Remove from project, in the plate's menu, pulls it out of the panels
that were using it and out of the tray. The file stays in assets/, so
nothing is lost by accident, and Ctrl Z
undoes this too.
The inspector
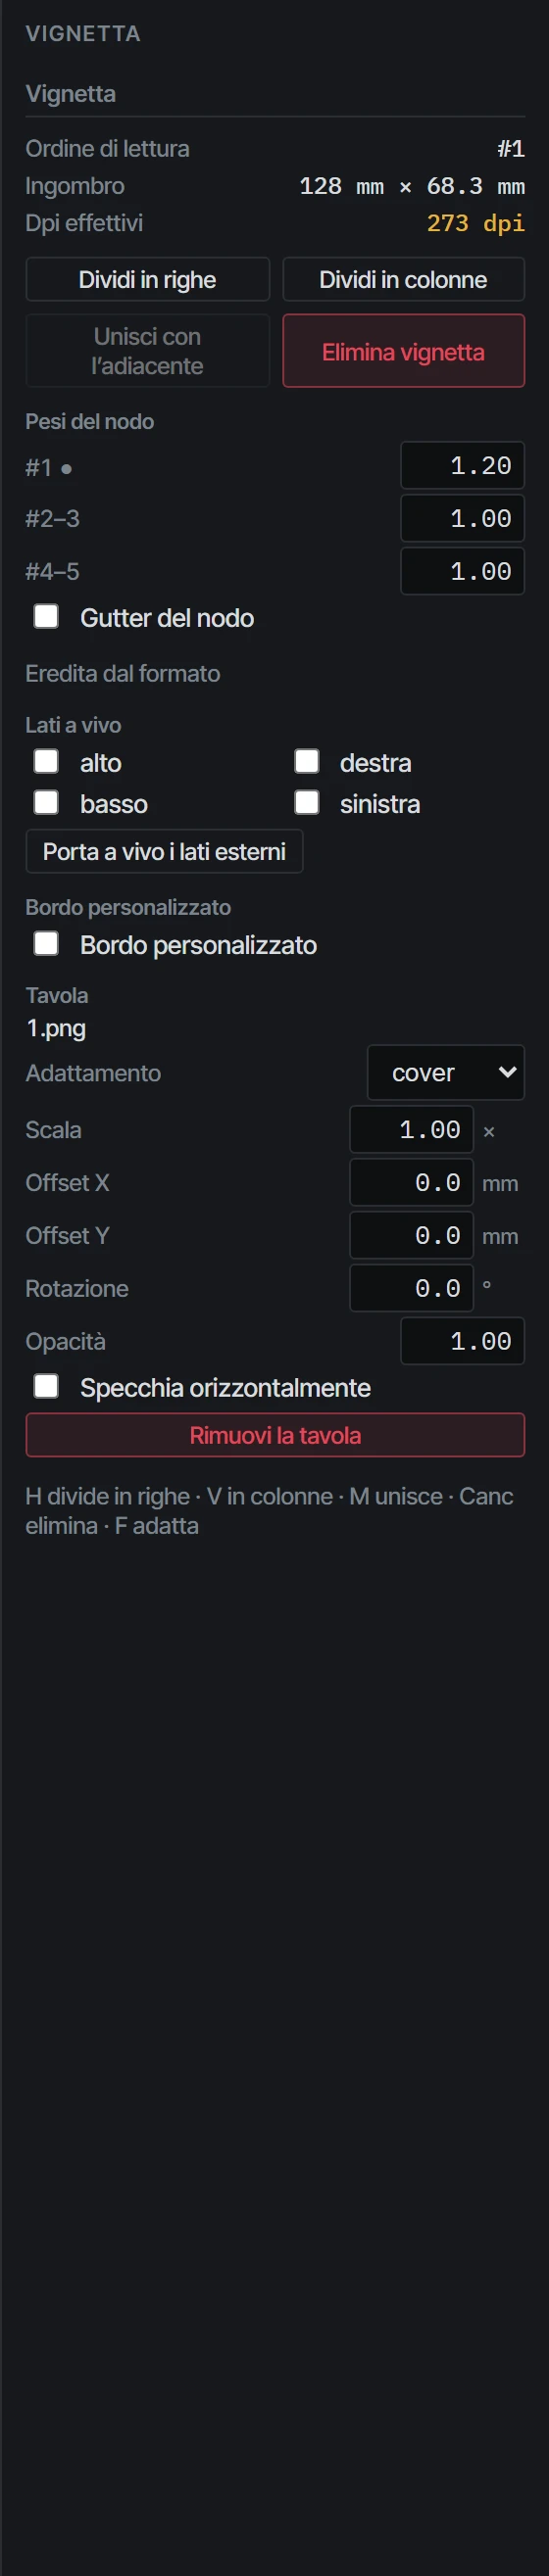
The right-hand panel changes with the selection, and shows one thing at a time. With nothing selected you get the project's values: format, bleed, frame, gutters, resolution, binding, panel border, and just below them the current page. With a panel selected you get only the panel.
Page overrides are there to make an exception without touching the rest of the chapter: widen the frame on page five alone, or change the background of a single page, and a button puts that page back on the project's values.
Every numeric field can be edited from the keyboard too: the arrows move by half a millimetre, and by a tenth while holding Shift. The numbers are set in a monospaced face on purpose, so they do not dance about while you change them.
Guides and preflight
The Guides menu turns the overlays on and off: bleed edge, trim, frame, gutters, reading numbers, a ruler in millimetres, and the reading ruler, the line that joins the centres of the panels in the order they are read. None of them ends up in the export: they are there for you.
Check opens the preflight, which goes through the whole chapter and gathers what is worth looking at before sending it to print:
- pages with no artwork at all, and panels left empty;
- artwork that is no longer on the disk, with the missing path;
- plates below the project's resolution, with the effective dpi;
- panels with no area left, because two cuts cross;
- panels running outside the bleed, which will be cut off;
- sides marked to bleed that do not touch the frame, and so do nothing.
It is not a gate: you can export anyway. It is there so you do not discover at the printer's something that was visible from here.
Exporting
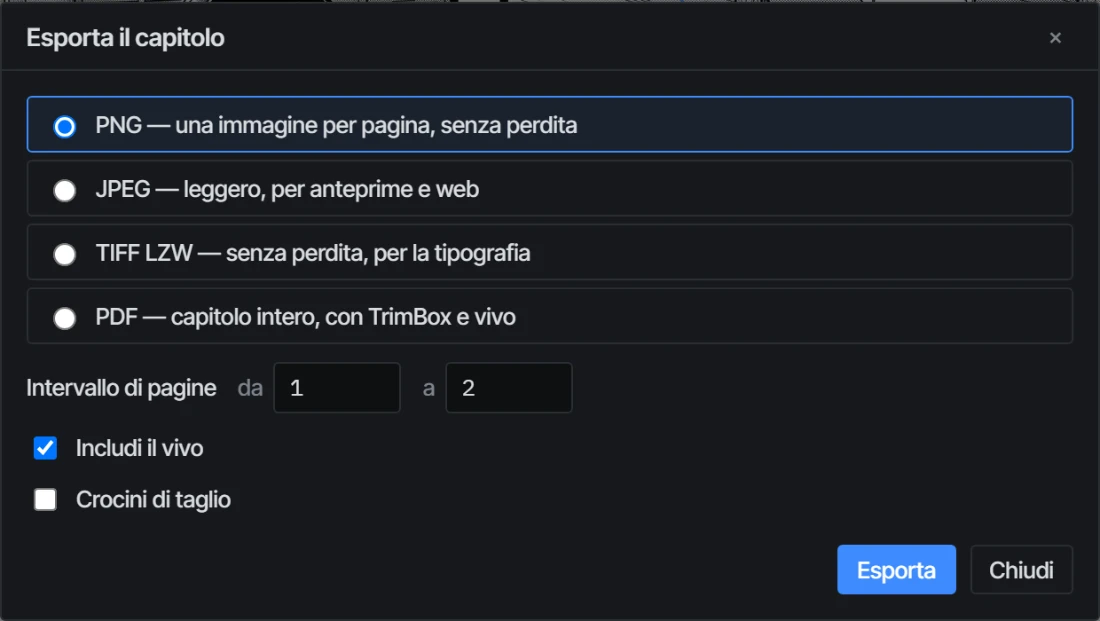
Four formats, one for each job.
| Format | What it is for | What comes out |
|---|---|---|
| PNG | Printing, and archiving | One image per page, lossless, with the resolution written inside |
| TIFF | The printer | Lossless LZW compression, 8-bit greyscale or RGB |
| Delivering the chapter | A single multi-page file, with TrimBox and bleed declared | |
| JPEG | Previews and the web | Light, with adjustable quality |
Choose the page range, whether to include the bleed and whether to add crop marks. Crop marks require the bleed and add 10 mm of margin all round, because that is where they get drawn.
The files end up in export/, in a subfolder named with the date and time
of that export, so two attempts do not overwrite each other. The export runs on a
separate thread: the bar advances page by page and you can stop it.
What the printer finds in the PDF
For A5 the sheet measures 154 × 216 mm, which is the trim plus 3 mm of bleed per side. Declared inside it are the TrimBox, that is, where the guillotine will pass, at 148 × 210 mm centred, and the BleedBox. It also declares that the chapter reads right to left and how facing pages should be paired, so even someone opening the file knowing nothing about the project sees it the right way round.
The export always draws from the originals at full resolution. Previews are there to keep the editor moving; they never end up in print.
Saving
There is no "save" command to remember. Two seconds after your last change Komawari writes the project on its own, and the status in the top bar says where it has got to: Changes pending, Saving, Saved.
The write goes through a temporary file which is then renamed, so if the computer
shuts down halfway you are not left with a project.json cut in two. The
last five saves stay in .cache/backups/.
The undo history covers every operation on the document, including the ones on artwork: Ctrl Z to step back, Ctrl Shift Z to redo.
Save .zip packs the entire project, artwork included, into a single file. It is how you move it to another computer, or keep a copy, and it reopens from the start screen.
Shortcuts
On macOS, Cmd instead of Ctrl. The single letters apply when the focus is not inside a text field.
| Keys | What it does | When |
|---|---|---|
| Ctrl Z | Undo | Always |
| Ctrl Shift Z | Redo, as does Ctrl Y | Always |
| Ctrl N | Add a page after the current one | Always |
| H | Split into two rows | Panel selected |
| V | Split into two columns | Panel selected |
| M | Merge with the neighbouring sibling | Panel selected |
| F | Fit the whole plate inside the panel | Panel selected |
| Delete | Delete the panel, its area goes to the sibling | Panel selected |
| 0 | Put the cut back straight | Separator selected |
| Esc | Deselect | Always |
| Alt | Suspend snapping while dragging | On a handle |
| Shift | Rotate every cut in the node, or rotate the plate by 15 degrees | On a handle, or inside a panel |
| Space bar | Drag the sheet, as the middle mouse button does | While held down |
| Double-click | Put the plate back centred, at scale 1 and unrotated | On a panel |
Page formats
Measurements in millimetres. The gutter is part of the preset, not a constant: it is proportioned to the page, so the gap between panels carries the same weight at every format.
| Preset | Trim | Bleed | Frame | Gutter | Notes |
|---|---|---|---|---|---|
| A5 | 148 × 210 | 3 | 128 × 190 | 4 / 4 | Italian bookshop format, the default |
| B5 JIS | 182 × 257 | 3 | 158 × 233 | 5 / 5 | Japanese magazine format |
| Tankōbon | 128 × 182 | 3 | 110 × 160 | 3.5 / 3.5 | Pocket-sized |
| Custom | free | free | free | free | Every field by hand |
At 300 dpi a trimmed A5 comes out at 1748 × 2480 pixels, and 1819 × 2551 with the bleed. A5 and B5 JIS have almost identical proportions, half a percentage point apart, so a chapter moves from one to the other with no distortion you would notice.